By Julian Weisner, Culinary Scientist
Cooking Perfect Eggs in a Pan
I know everyone has horror stories of trying to cook eggs in a stainless steel skillet, from burning and sticking to rubbery whites and tiring clean ups. But fear not, we have worked out the kinks to make some fool proof methods for you to knock it out of the park.
The first thing we need to solve is sticking!
A quick peek at the tools you need to ensure you get the best possible outcome with your eggs, whether its a simple scramble or that perfectly golden sunny-side up egg.
- The right fats and low temperatures are for Sunny side up, Fried Eggs, and Egg White Omelettes.
- High temperatures are what to use for Spanish-style Olive Oil Fried Eggs
- A combination of moderate heat and the right fats, are the way to ensure your hometown Scrambles and Country Omelettes, slide off the pan easy.
- Holding a super low temperature, as if you were using a double boiler, is the way to get a custardy creamy French Scramble for a decadent morning treat.
Why Do Eggs Stick and How Do We Stop It?
Sticking comes from the eggs bonding with the pan…the eggs start very liquidy, and as they cook they get firm. On a very small scale when the eggs are liquidy, they fill the microscopic nooks and crannies of your pan. As they cook the eggs get firmer- just like cement- and begin to bond to the pan and stick. In order to keep them from sticking we need to stop the eggs from getting into the nooks and crannies of your pan!
In nonstick and well seasoned cast iron skillets this is solved by filling all of the peaks and valleys of the cookware with either a special coating or a good seasoning. This produces a surface that is smooth even on a microscopic level. Now when you add the eggs, there is nothing for them to stick to, easy! But can we even do that with stainless steel!?
Fats
Yes! We can put something between the pan and the egg: a fat. But not just any fat, we need the right fat. We can’t use regular cooking oil because it becomes too runny when heated. When we add eggs to regular oil, the oil moves aside. The egg then sinks through to the bottom of the pan and sticks. Remember water is heavier than oil, and an egg is mostly water.
What we need is a fat that stays in place and sticks to the pan. This way when we add an egg the fat will stay between the egg and the pan. We can accomplish this with non-stick spray or butter. Both of these have a mixture of ingredients that help adhere them to the pan. The key player in this case is lecithin, an emulsifier typically used to hold water and oil together in things like mayonnaise. In this case it holds our fats down to the pan.
Now, when we add our eggs to the pan they float on top of a layer of fat and never actually touch the pan. This technique works great for cooking eggs without a lot of movement like fried eggs and egg white omelettes.
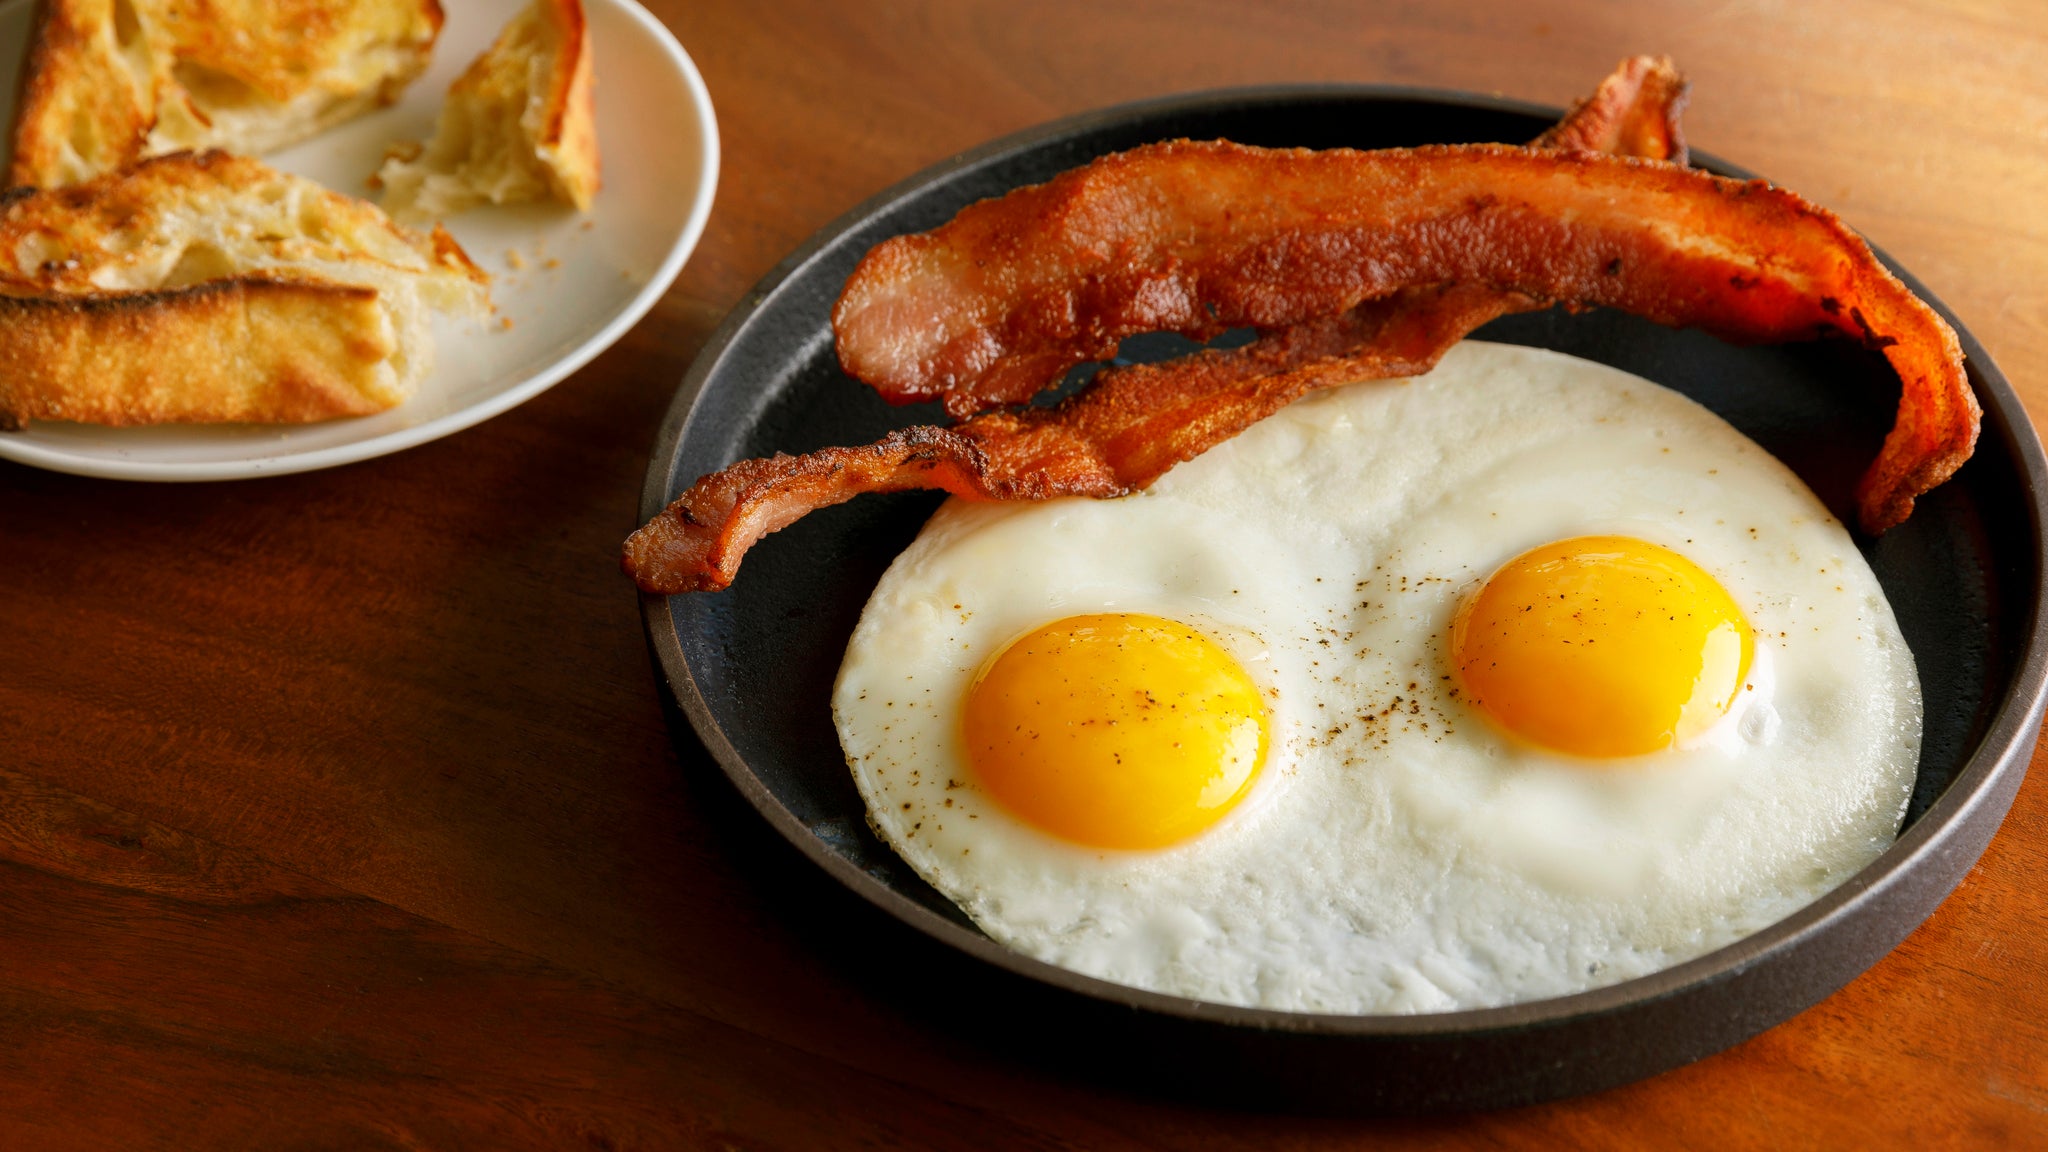
Cooking Fried Eggs in a Pan
Low Temperature: Sunny-Side up, Fried Eggs, Egg White Omelettes
Knowing what we know about fat, let’s use this knowledge to make the best eggs! By allowing the egg to cook slowly at a low temperature the whites will cook through without getting rubbery. This is the key to a delicate egg white omelette (what is essentially a "yolk-less" fried egg), or a perfect sunny side up egg.


High Temperature: Olive Oil Fried Egg
The next tool we can use to stop the egg from sticking to the pan is high temperature. And since we are cooking at such a high temperature, we can’t use butter. So in this case we will use oil to explain what’s going on. As we make our pan hotter and hotter we can get the egg to cook before it sinks through any oil and sticks. The olive oil fried egg is a great example of this, by heating the pan up to 430°F we are cooking the bottom layer of the egg right as it hits the oil. Now that the bottom is firm, it can’t stick to the pan.

Cooking Egg Scrambles and Country Omelettes
Moderate Temperature + Fat = American Scramble and Country Omelettes
In scrambles and omelettes we can use both of these tools- fat and temperature- to ensure our eggs are stick free.
For omelettes and scrambles, we use nonstick spray or butter just like fried eggs, but we also use a higher temperature to speed up the rate at which the eggs cook. We start the pan at 325ºF and stir our eggs. For the scramble we stir until they are completely cooked. But for the omelette, after a quick stir we drop the temperature to 310°F and slowly finish cooking to ensure a tender result.


Low, Low Temp: French Scrambled Eggs
The only way to truly cook a fat-free egg–while still keeping it from sticking to the pan–is to use a really super low temperature. We are talking less than the boiling point of water, 185°F to be exact. This temperature is just over the point at which egg white proteins set.
This is the technique implemented in the French-style scramble. Much like a creamy egg custard or ice cream base, we slowly cook the eggs while constantly stirring. This ensures that the egg proteins are suspended while they cook. Now instead of attaching to the bottom of the pan the egg binds to itself and builds small curds, resulting in a scramble that is more creamy and almost custard-like compared to a firmer traditional American scramble.
Because of this technique, you don't have to use any fats when cooking. We use them for the recipe here because, well, butter is delicious.

Converting Precise Temperature for Eggs to Your Stovetop
We’ve provided approximate conversions for the temperature and timing for your current stove top. We can’t promise the same results without the precise temperature provided by the Hestan Cue System, but you can still follow along. Use the recommendations below to see how precision temperatures for eggs convert to the more familiar high, medium or low settings on your stovetop.

Overview of Egg Grading
Eggs are graded by the United States Department of Agriculture into 3 consumer grade categories. AA, A, and B, each of these categories relates to the “quality” of the egg as determined by the USDA. The basis of this quality standard comes from judging the shape and texture of the shell, in conjunction with a process called candling. Candling is when you hold the egg up to a bright light and look through the shell in order to ascertain the quality of the egg.
The best way to compare each grade is to crack them onto a plate, an AA egg will have whites that are “thick and firm” according to the USDA website, this means that the whites hold together on the plate instead of spreading out, so they will stand up higher.
As the grade goes from AA to A and then B, the whites will spread more and more yielding a thinner white. Likewise AA eggs will have a yolk that that sits high up with a nice dome shape, as the grade decreases the yolk will not sit as high on the white and will start to flatten onto the plate, the same kind of spreading as you see with the white essentially. On top of all of that, AA eggs are almost entirely free from defects or blemishes making them perfect for fried or poached eggs where appearance is important.
All of the egg grades are equally as fresh, however the qualities that determine a lower grade like looser egg whites and flatter yolk, are also qualities of an older egg. So in a sense an AA egg that has been sitting in your fridge for a few weeks will have a thinner, "spread-ier" white and yolk like a B egg, but will still be almost free of blemishes.
Age
On the note of age, the easiest way to determine how old an egg is to place it, shell and all, in a glass of water. As eggs age they dry out slowly and the moisture that is lost is replaced with air. The extra air will make an older egg float in a glass of water, while a fresh egg will sink to the bottom!
Size
All of our recipes are built for Large eggs, because they are the most common size sold in stores; however, did you know that the USDA grades eggs all the way down to “Peewee”? We’re not joking!!
The USDA sizes eggs by the weight per dozen, for example a dozen large eggs must be between 24oz and 27oz - that is a little more than 2oz per egg on average. This also means an Extra Large egg does not have to be physically bigger than a Large egg, but you can be sure it will weigh more.
Here are all of the weights the USDA uses to determine egg size:
|
Size or Weight Class |
Minimum net weight per dozen |
|
Jumbo |
30 ounces |
|
Extra Large |
27 ounces |
|
Large |
24 ounces |
|
Medium |
21 ounces |
|
Small |
18 ounces |
|
Peewee |
15 ounces |
FAQs
Does it matter what size my egg is?
Yes, this chart is built for Large eggs, if your eggs are larger expect to add more time, if your eggs are smaller, expect it to take less time.
Does the color of the egg make a difference?
No, go out and find the most colorful eggs you can, how about Green eggs and Ham?
Does the grade of the egg matter?
No, the grade of the egg will not affect the cook time that much, but it will affect what it looks like, AA eggs are best for sunny side up and fried eggs, since they will look the prettiest.
Does the freshness of the egg matter?
A little, the freshness of the egg will affect how much moisture is in the egg, less moisturizer will speed up the cooking time a bit. Other than that, you will find that older eggs are not as pretty for your Sunny Side up instagram post, but otherwise they will cook fine.
Can I use duck eggs?
Yes, but beware duck eggs are usually larger, so expect to have to increase your cook times.
Can I use bacon fat?
Are you reading my mind!? If they let me, I would have written everything for bacon fat, but in general animal based fats have a good amount of the adhering quality that butter and nonstick spray has. So go ahead and get funky with it, why stop there Duck fat is good too!
With all of that, go cook eggs!
Check out the Hestan Cue app for iOS and Android to learn more about precision cooking with Cue, and all the things you can do! If you found this guide helpful, please let us know–we would love to hear your feedback.
Keep us posted with photos of your experiments and share your results and #CueTips with the community!